E2 Pulse Oximeter
This equipment is mainly important for breathing problems as in
Breathing problems of a neonate and young infants.
Subsection of this chapter:
- Clinical Problem
- Assessment
- Management
- Infection Prevention
- Complications
- Care & Maintenance
- Troubleshooting & Repair
NEST360°. Newborn Essential Solutions and Technologies-Education –
Clinical Modules: Pulse Oximeter. (June 2020). License: CC BY-NC-SA 4.0.
Clinical Problem
Assessment of oxygen saturation with a pulse oximeter should be used as part of
routine assessment for all infants on admission.
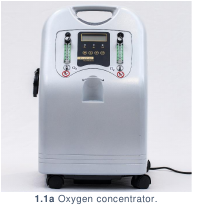
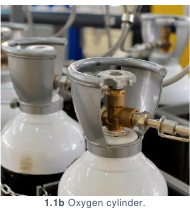
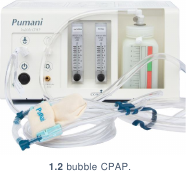
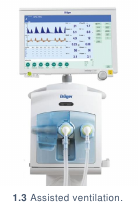
Pulse oximeters should also be used during treatment for all sick or at-risk patients, or
those being treated with oxygen therapy (1.1a, 1.1b), CPAP (1.2), or any form of assisted
ventilation.(1.3)
Assessment
Peripheral pulse oximetry is a non-invasive & painless process of measuring heart
rate and oxygen saturation (oxygen bound to haemoglobin in the capillaries).
Pulse oximeters may be used to help determine the severity of an infant’s illness by
evaluating if blood oxygen saturation is low and if respiratory support is needed. Pulse
oximeters also may be used to assess the success of treatment and determine a need
for increasing or decreasing respiratory interventions to achieve target SpO2.
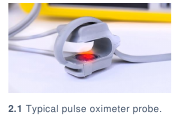
Pulse oximeters have one red- and one infra-red light-emitting diode and a photodetector.
(2.1) The light emitted by the diodes is absorbed by tissues, and amount of absorption is
measured by the photodetector. Functional haemoglobin bound with oxygen is called
oxyhaemoglobin. Percent saturation of oxygen bound to haemoglobin is called SpO2. A
microprocessor within the pulse oximeter determines the percent of oxygen in the blood
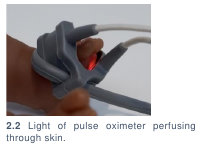
by comparing the concentration of deoxyhaemoglobin to oxyhaemoglobin at two different
light wavelengths. (2.2)
When using a pulse oximeter, several factors impact the stability of the patient’s trace.
Examples of a “normal signal” & potential “poor traces” are below. (2.3)

Pulse oximeters may be:
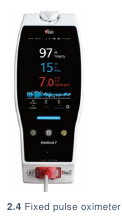
- Fixed (2.4) (for continuous reading of one patient)
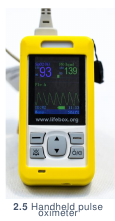
- Handheld (2.5) (for spot reading vital signs between patients, or the same patient at
intervals)
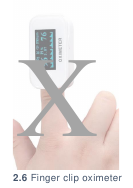
- Finger clip (2.6) (for continuous or spot reading of vital signs; only appropriate for adult
or older paediatric patients. NOT recommended for use in neonatal patients)
The same pulse oximeter can be used for adult, paediatric, and neonatal patients. The
alarm settings should be changed on the oximeter and appropriately sized probes must
be used. Probe size will vary depending on patient age.
Normal SpO2 for neonatal patients should be:
- 90% - 100% if not on oxygen
- 90-95% on oxygen (Alert 2.1)
If SpO2 readings are less than 90%, the patient should be considered for supplemental
oxygen therapy (see oxygen concentrator module).
Oxygen saturations, heart rate, and clinical condition should all correspond.
| ? |
ALERT 2.1 Oxygen targets in newborns |
Exact oxygen saturation targets for premature newborns remains an
area of controversy. However, most authorities agree that saturations
between 90-95% are reasonable to minimise complications associated
with low and high oxygen levels, including death, neurodevelopmental
impairment, and Retinopathy of Prematurity.1-4 |
Management
Management of a pulse oximeter covers how to use the device in a variety of
settings, including set up for a patient, patient preparation & commencement, care
whilst on the device & removal of the patient from the device.
SETTING UP FOR A PATIENT
- Follow hand washing procedures.
- Collect:
- Pulse oximeter
- Pulse oximeter probe
- 70% alcohol solution (Alert 3.1)
- Cotton swab
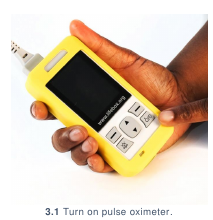
- Turn on pulse oximeter by pressing and holding the power button. (3.1) The display should
turn on.
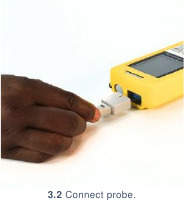
- Connect the probe. (3.2)
- Check the shapes of the pulse oximeter port & external probe sensor. If these are
not the same size, you need an adapter. This should be provided with the pulse
oximeter.
- Connect the probe connector to the pulse oximeter probe port. Careful not to bend
the pins.
- Check for a red light on the probe. If the probe displays a red light, take steps to prepare
patient for device. If the probe does not display a red light, follow the guidelines in Pulse
Oximeter: Troubleshooting & Repair | If the pulse oximeter is turning on, but no trace is
showing.
- Clean the pulse oximeter probe thoroughly using alcohol and a cotton swab.
| ? |
ALERT 3.1: Low level disinfection solutions |
Disinfection of equipment should always comply with manufacturer
guidelines. General guidance on environmental cleaning and disinfection
of equipment was taken from Infection Prevention and Control:
Reference Manual for Health Care Facilities with Limited Resources,
Jhpiego, 5 Module 6 which lists isopropyl alcohol (70-90%), sodium
hypochlorite (0.05% or >100ppm available chlorine), quaternary
ammonium, and Iodophor germicidal detergent as appropriate for low
level disinfection. Phenolic germicidal detergent is also listed in this
category but should not be used in neonatal wards since affordable,
effective alternatives are available; and, there are concerns it may cause
hyperbilirubinemia and/or neurotoxicity in neonates. 6 |
PREPARING A PATIENT
- Follow hand washing procedures.
- Always explain the purpose, risks, and benefits of a procedure to guardians
BEFORE performing the procedure.
- Collect:
- Neonatal clip or wrap probe
- Pulse oximeter
- Gauze
- 70% Alcohol
- Select best location on patient to collect reading:
- Wrist or foot (wrap probe); fingers or toes (clip probe)
- Well perfused, warm and with intact tissue
- Clean location with alcohol & gauze.
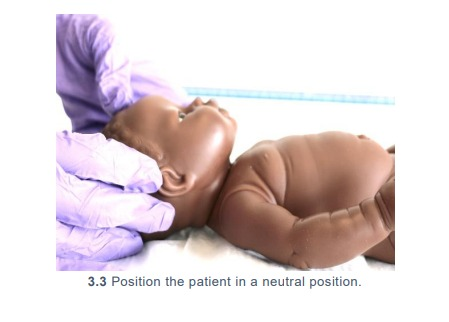
- Position the patient in a neutral position (3.3)
to ensure airway patency.
STARTING A PATIENT
- Adhesive (one-use) wrap probe:
- Remove the wrap probe from its packaging and peel from its plastic base.
- Place the part of the tape with the sensor, sensor side down, on the wrist whilst
palm-side up or on the sole of the foot. The wrist is only suitable for preterm babies.
- Wrap the adhesive strip around the wrist or foot to secure in place.
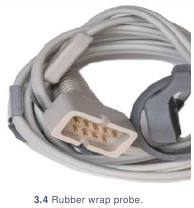
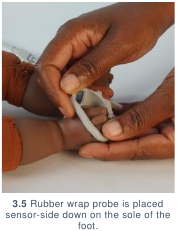
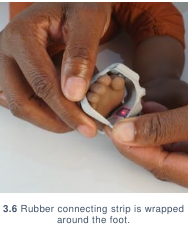
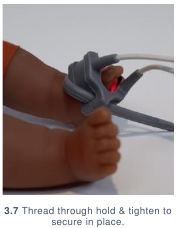
- Rubber (reusable) wrap probe: (3.4)
- Place the part of the wrap probe with the sensor, sensor side down, on the wrist
whilst palm-side up or on the sole of the foot. (3.5)
- Wrap the rubber connecting strip around the wrist or foot (3.6), thread through hole
& tighten to secure in place. (3.7) Ensure the light and sensor are opposite each
other.
- Clip probe:
- Squeeze the tips of the clip probe to open.
- Place gently on the patient’s fingers or toes and release.
Wrap and clip probes should be firmly placed without need to be held. The probe should
not be so tight that it is causing pressure on the skin or impairing circulation.
CARING FOR A PATIENT
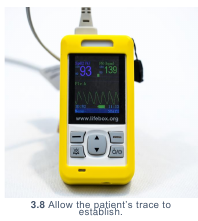
- Allow the patient’s trace to establish before reading SpO2 and heart rate. (3.8)
These should correspond to patient’s clinical condition. If they do not correspond,
reposition the probe to ensure good contact with the patient.
- Record SpO2 and heart rate in patient documentation. Pulse oximeters are
inaccurate for readings under 70%; readings between 20% and 60% do not
correlate to clinical deterioration or improvement. (Alert 3.2) A low reading should
alert you to look for a problem with the probe fixation, baby or oximeter.
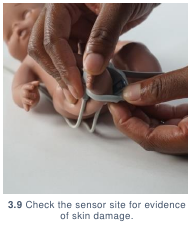
- If continuously monitoring patient, periodically check the sensor site (3.9) during
monitoring for evidence of skin damage.
- Keep the parents informed of baby’s progress.
| ? |
ALERT 3.2 Accuracy thresholds for pulse oximeters |
WHO Technical Specifications for Oxygen Devices7 lists
accuracy between 70-100% SpO2 as a minimum requirement for all types of pulse
oximeters. Additionally, during NEST360 ̊ technical testing and review,
most (if not all) devices were only tested by the manufacturer to
guarantee accuracy within a certain precision between 70 -100%. |
REMOVING A PATIENT
Removing the probe from the patient varies based on the type of probe in use:
- If using an adhesive wrap probe: peel adhesive away from patient & pull probe away
from patient. Disinfect probe site on patient & wrap probe with 70% alcohol if reusing.
- If using a rubber wrap probe: unthread rubber connecting strip through the hole. Pull
probe away from patient. Disinfect probe site on patient & the wrap probe with 70%
alcohol.
- If using a clip probe: press on the tips of the clip probe to open. Gently pull away from
patient. Disinfect probe site on patient and clean probe with 70% alcohol.
Infection Prevention
Routine and adequate cleaning of medical devices is critical to prevent hospital�acquired infections in newborn care units. If devices and equipment are not
disinfected or reprocessed promptly or adequately between patients, they may
pose a significant infection risk.
GENERAL INFECTION PREVENTION
- Clean hands with soap and water or 70% alcohol before and after assessing a
patient using a pulse oximeter or handling any probes that will be used on a patient.
- Ensure that all patient-related consumables (including probes) are new or have
been cleaned thoroughly before use. Any patient-related consumables must be
cleaned before they are used to assess another patient using the pulse oximeter.
- All patient-related consumables should be stored in a clean, dry location. Keep
cleaned probes separate from those waiting to be cleaned. Any cables should be
loosely wrapped & secured, preventing sharp bends, pinches or kinks, which will
decrease their lifetime.
DISINFECTION AFTER USE
- Clean reusable probes with alcohol. Adhesive probes are specified for single-use;
if reusing disinfect sensor with alcohol. (Alert 4.1)
- If pulse oximeters or patient consumables (including probes) are not cleaned
thoroughly before use, infection can be transmitted. Care should be taken
particularly for consumables marked as single-use but are reused (such as
adhesive wrap probes).
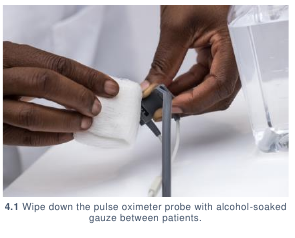
- Between patients, wipe down the pulse oximeter with alcohol. (4.1) Be careful not
to submerge or drip alcohol onto the pulse oximeter or any of its cables.
| ! |
ALERT 4.1 |
While many pulse-oximeter probes are designed to be single use
devices, cost and logistical constraints make this unrealistic in many
low resource settings. Recommendations for cleaning single use
devices were taken from Infection Prevention and Control:
Reference Manual for Health Care Facilities with Limited Resources,
Jhpiego.5 Vigilance by healthcare workers to assess that pulse-
oximeter readings correlate to patient’s heart rate and clinical
condition is especially critical when re-using probes meant for
single-use. It is not known how rapidly pulse-oximeter probes
degrade or become inaccurate with re-use.
|
Complications
Introduction of equipment in newborn care units poses clinical and device
complications for patients. Awareness of potential complications is critical to
maximise patient safety.
CLINICAL COMPLICATIONS
- Misdiagnosis: a poor trace (5.1) may contribute to misdiagnosis and can result from:
- Hypovolaemia/hypotension: poor peripheral perfusion or movement may cause a false
reading.
- Peripheral cyanosis/anaemia: poor oxygen delivery to the tissues, compromises
measured saturation. Saturation readings below 70% are not reliable as clinical
guides.
- Hypothermia: causes poor peripheral perfusion which in turn can provide an inaccurate
representation of the oxygen saturation within the blood.

Zoom in to see details
- Pressure sores: if the pulse oximeter probe is attached too tightly, inappropriately or too
long at one site, pressure sores may develop. The warmth of the light may irritate the skin
of a premature baby which is why the probe needs regular repositioning.
DEVICE COMPLICATIONS
- Poorly fitting probes can lead to inaccurate saturation measurements: if the probe is
too large for the patient, the probe will shift in place, creating issues both in terms of
inconsistent measurement due to multiple contact points as well as the potential to have
no direct contact points with the skin. If the probe is too small for the patient, blood flow
may be constricted and the reading affected. Also, the light and sensor must be positioned
opposite each other.
- Patient movement: as the patient moves, the contact point between the probe and the
patient moves along the patient’s skin. This movement provides an inconsistent
measurement because it samples from various contact points in the skin, rather than
remaining in the same contact point of tissue.
- Strong light: if strong light (e.g., phototherapy, exam lights, or sunlight) is on a probe
sensor, the light signal from the pulse oximeter probe may be drowned out by the stronger
environmental light, leading to incorrect results. A cloth covering of the sensor site will
protect it from bright light.
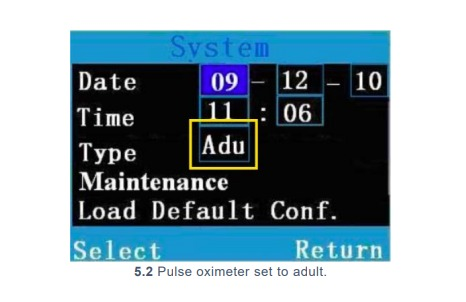
- Oximeter alarm settings: pulse oximeters may have adult, paediatric, and neonatal
settings in the same device. (5.2) Pulse oximeters are usually set to a default adult setting.
If the pulse oximeter is not set to neonatal parameters, alarms may sound inappropriately.
Care & Maintenance
Users are responsible for basic first-line care and maintenance to ensure
equipment lasts to their potential lifetime.
POWER SOURCE
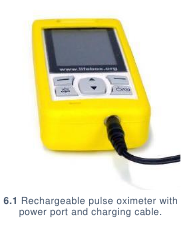
A pulse oximeter is powered by replaceable or rechargeable (6.1) batteries. If using a
rechargeable device, the users should regularly charge the pulse oximeter when not in
use to ensure power in the event of a power outage.
WARD LOCATION
When using the pulse oximeter, the device should be placed in a secure location to
prevent drops and breakages. The device and associated probes should be stored in a
clean, dry, and secure area. The device should never be placed inside a cot or bassinet.
USER PREVENTIVE MAINTENANCE
Preventive maintenance should be conducted to ensure that the pulse oximeter is in good
working order for emergency use.
- Turn on the pulse oximeter. Connect the probe and check for a red light.
- Connect a clip probe and test readings on your finger for normal saturations (above 90%).
(6.2)

Troubleshooting & Repair
Although users are not responsible for repairing their devices, there are steps that
may be taken to troubleshoot first-line errors that may occur before contacting
maintenance or engineering support.
| 1 |
The pulse oximeter is not turning on: |
|
- Check the batteries or charge on the pulse oximeter.
- Install new batteries and try again, spare batteries should be available on the
ward.
- Make sure you press and hold the power button for at least 5 seconds.
- If the pulse oximeter is still not turning on, contact your maintenance department
for assistance.
|
| 2 |
Pulse oximeter is turning on, but no trace is showing: |
|
- Check the probe for a flashing red light. If there is no light, check that the pulse
oximeter probe is still connected to the pulse oximeter.
- If the pulse oximeter probe is still connected and no light is showing, try
replacing the probe (and adapter, if using) with a different probe (and adapter,
if using).
- If after replacing the probe (and/or adapter) there is still no light, contact
your
maintenance department for assistance.
|
| 3 |
If there is a red light flashing but no trace is showing:
|
|
- Wait at least one minute for signal to improve.
- Ensure that the probe is dry and clean, skin is dry and that the extremity used
for assessment is warm and well perfused. Try an alternate extremity.
- If after addressing above issues you are still unable to obtain a trace contact
your maintenance department for assistance.
|
| 4 |
If pulse oximeter is turning on but taking time to stabilise trace:
|
|
- Check that no powerful light sources are shining on the pulse oximeter probe.
- Confirm that the patient is not moving and that the probe is still securely
attached.
- Confirm the probe is dry and clean.
- Choose an extremity that is warm, dry, well perfused and wait at least one
minute for the signal to stabilise before trying an alternate extremity.
- If after addressing above issues you are still unable to obtain a trace contact
your maintenance department for assistance.
|
All pulse oximeters have a users’ manual. These should be accessible online. If not
available for download online, contact the manufacturer to request access to a copy.
References
- Bancalari, E. & Claure, N. Oxygenation Targets and Outcomes in Premature Infants.
JAMA 309, 2161 (2013).
- Cummings, J. J., Polin, R. A. & Committee on Fetus and Newborn. Oxygen Targeting in
Extremely Low Birth Weight Infants. Pediatrics 138, e20161576 (2016).
- Manja, V., Lakshminrusimha, S. & Cook, D. J. Oxygen Saturation Target Range for
Extremely Preterm Infants: A Systematic Review and Meta-analysis. JAMA Pediatrics
169, 332 (2015).
- Polin, R. A. & Bateman, D. Oxygen-Saturation Targets in Preterm Infants. New England
Journal of Medicine 368, 2141–2142 (2013).
- Curless MS, Ruparelia CS, Thompson E, and Trexler PA, eds. 2018. Infection Prevention
and Control: Reference Manual for Health Care Facilities with Limited Resources.
Jhpiego: Baltimore, MD.
- Sharma, G. Infection Prevention and Control at Neonatal Intensive Care Units. 134.
- WHO-UNICEF technical specifications and guidance for oxygen therapy devices. (World
Health Organization and the United Nations Children’s Fund (UNICEF), 2019).


